Quantcast
Channel: modeling in 1/87
Viewing all 54 articles
Browse latest View live

on the job - here to assist

$
0
0


I don't particularly like the thoughts of having to call for a tow in real life. But for some reason the wrecker has become one of the model types I do quite a few of. When I started building them I was using wrecker units from other models and a favorite was the Holmes unit that came with the B and R model Macks that were so well done by Athearn. The International R 190 above left came from Classic Metal Works and I fit the Holmes wrecker unit from Athearn directly onto the chassis and added some corrugated metal fenders. It's companion to the right is the IH LC 180 cabover that had a bed from a Wiking model altered to hold the Holmes unit.

Much more to my liking and frankly just a much better model is the Sheepscot IH R190 in a solid resin cab. This cab is prototypically correct and appears less toy like than the CMW offering. I scratch built the tow boom on this model.


I showed this one already but it's one of my favorites. The 1930's Zis 5 from Roco that I scratch built the wrecker body for out of old watch parts and styrene. Just another glimpse above.


I have a customer and now friend that loves his old trucks and among his collection resides a 1938 round nose Ford cabover. When Clare Gilbert of Sylvan put out the call for info on this truck I went over to my friends barn with camera and ruler and gave the information and photos to Clare. He was kind enough to give me the first of this model to which I scratch built the wrecker unit for on what you see above. I was very pleased at what Clare did with this truck and am happy to have been able to contribute to bringing it to the scale.


Another of Sylvans trucks that you have already seen is the '37 Chevy. This time done up as a tow truck with again, a scratch built wrecker unit. These are rather simple affairs really with styrene rod pinched on the ends and a Tichy bolt used to hold them together. The winches are mostly all scratch built as well on these trucks.


The model above is one of the resin castings of the Wiking '56 Chevy I mentioned in an earlier post. In the resin casting process it sometimes occurs that voids and bubbles appear. This I tried to overcome by making a beater 4x4 wrecker with this model. The bed on this is a very nice piece that comes with a Trident model of a newer Chevy that I put on a chassis from a 1/72 scale Jeep.


Another '56 Chevy available in the scale is the LCF, a resin kit from Resin Unlimited. For this truck, I scratch built the bed and wrecker unit.


As you can see, I've cranked quite a few tow trucks out and most of them altered greatly from the original model. However, sometimes I just like detailing an already good model which is what happened here with the Wiking Peterbilt. Some nice photo etched mirrors, different tires and rims and a few decals over a glossy paint job here is all that was done.


OK, one more as I watch the clock ready to go to AM from PM here. This a really heavy duty military rig. The M936 from Roco Minitanks that was detailed by painting and adding a protective screen for the wrecker operator, hydraulic hoses and a chain.
Hope you enjoyed and don't need the services of a tow truck anytime soon.

tanks a lot

$
0
0

I suppose looking at the prices on the gas pumps the other day made me think of this one. No matter what the liquid is that we are in contact daily with, usually was in a tanker of some sort or another at one time. Even water is either transported by tanker or used from a tanker like in the example above of the '56 Chevy LCF that is similar to many fire department tanker unit from back then. The resin cab for this truck was placed on a Roco military chassis and made to look like the old 4 wheel drive conversions back then by Marmon-Harrington Corp. The tank itself ironically is made from a cigarette lighter that I made bunks for to fit on the chassis.


Of course tankers are most well known for hauling fuel as is the case with the unit being hauled here by a Mack Vision with flat top sleeper. The tanker is from Promotex and has merely been repainted and detailed.


Way back when, food related liquids were almost always hauled in wooden tanks. The truck above was modeled after a cider/vinegar transport truck. The truck itself is a 1922 Packard and the tank is modeled with Manila paper wrapped around a wooden dowel.


I knew I'd get around to showing more of that 1930's truck that I made so many versions of in an earlier posting. Here's one more in the form of a tanker. The tank was made this time by wrapping a dowel with sheet brass and a pair of wire bands.


If you remember seeing the movie "Duel" then you might recognize the Peterbilt 281 above that chased Dennis Weaver all over the desert in his poor little red Valiant. This model took some doing by adding 6 scale inches to the height of an inexpensive Imex Pete and cutting out the heavy window glazing that comes with the original model. Then the grille was scratch built and it was fit onto a customized chassis and all the details such as fuel tanks, steps, wheels/tires and mirrors were added. The trailer is an old Wiking piece that I added the tool/chain box to and all was heavily weathered. I love these old Petes and when I drove a truck, it was one similar to this.


The Peterbilt above is a rather unusual truck. It is a fuel and lube truck that would be in service supplying fuel, lubricants and hydraulic fluids to large equipment that cannot be driven back to a fuel and service facility. The spent fluids would also be carried away with a truck like this. The model itself is the WikingPeterbilt and the tanker bed is from a train load that has been detailed.


To the left above is another of the Sheepscot International R180's in a highway tractor pulling a fuel tanker similar to the one on the Duel Pete. On the right is the same Sheepscot R 180 cab this time in a milk tanker. The body on this is also from Sheepscot and is cast plaster. Two very distinctively different trucks using the same cab.


Often a piece designed for the military is quite suitable for civilian use as is the case above with the Oshkosh tanker. More commonly known as a HEMTT this model is from the RocoMiniatur civilian line and is painted to represent an airfield refueler.


We'll be entering the area of fantasy for this next piece as I don't believe anything like this ever really existed. But I loved the truck and wanted to do something really different with it. The Henschel is a German truck from the 30's that is shown here in an airfield fire/rescue unit that has been with hyrail wheels. Perhaps there was a large enough industrial facility to once need something like this but who cares really. I just like it.


Lastly I'm going to come around full circle and show another Chevrolet fire department tanker from 1956. This one is a resin casting of the Wiking Chevy that has been sitting roadside for many years.

Well again it's been my pleasure to show some of my builds to you all and I hope you enjoyed. Tanks again.

Where's the beef?

$
0
0

Since I just finished this latest diorama, I thought I would share it with you. It's based on a laser cut wood structure kit (my first actually) from Durango Press that they refer to as the newspaper office. Having scratch built many of my structures and used several different plastic kits, I wanted to go with an inexpensive laser wood kit for my first. I wasn't quite sure I would like them and to be quite frank, I'm not terribly enthused. Don't get me wrong, the kit was fine and turned out pretty good but I felt a bit constricted in just what it was I could do with it and the tolerances aren't what I myself like to deal with. Be that as it may, I had some fun with it and I hope you enjoy the end result. This is the photo that comes on the box to give you an idea of the manufacturers intentions.


The first step I took was to layout the building on a piece of 1/4" plywood, size the wood and seal it with shellac. I decided to do a butcher shop and use the small shed addition for a smokehouse building separate from the main structure. The next decision was to create a different elevation in the rear by making the basement a walkout. I used Evergreen styrene brick wall for foundations and added the window and doors to make it a walkout. By shaping and gluing 1" extruded styrofoam insulation board I was able to make the elevations for this configuration. As you can see, I've already assembled and braced the main structure and cut the foundation walls here but everything is just dry stacked for the moment.


At this point I know my footprint sizes so I am able to do some grading with plaster. Normally I like to paint the dried and shaped plaster with a dark color but all I had was red primer so this is what you see in the next photo. I've also finished building a door from wood and added the window to the brickwork. The sharp drop in grade between the buildings has had a retaining wall built from cut linoleum flooring. I individually painted the bricks to give a slight variation to the color and washed it with an acrylic linen white for the mortar joints. The doors have been distressed with a razor saw and washed with a rather thick wash of RR Tie brown acrylic then weathered with chalks.


I proceeded to tackle the small smokehouse then and used the same painting method as on the other brick. It has a corrugated steel roof on it and the sidewalls were weathered using the RR Tie brown with a wash of red chalk dissolved in alcohol. You'll notice some ground cover here that I put down that consists of a screened gravel I acquire from well drilling spoils. The roof is a bit too orange in this photo and you will see that I toned it down later. I put a wood jamb for the upper door and used another piece of corrugation for it and just boarded the window over.


Now was the time to do a little sceniking with Woodland Scenics coarse grass and a lot of natural materials. I'm always anxious to get to the point that I "plant" my structures permanently. After doing the signage on the front of the shop and installing the windows and tab shingle roof, I was ready. And with some additional details like a wood pile and some obligatory junk laying around I took it outside for the next photos.


Now I'm one that can't leave well enough alone. I just had to keep moving on this diorama since I saw so much potential for super detailing further. Everything else you are about to see makes up what I hope is the finished product. I've utilized several of the vehicles I already have built like the telephone pole truck, Ford Model AA stakebody and '37 Chevy panel truck and added a recently completed 1926 Essex coach. The butcher carrying a hind quarter (with newly added apron), pole crew, sheep and stuffy lady going into the shop to place an order were the last to be done to the diorama. How about a bunch of finished pics?

I dedicated this butcher shop diorama to Ken Hamilton whom has been a tremendous inspiration over the years with his phenomenal skills and generous advice. I only wish that my work can be nearly as good as his some day. It is my hope that this has been the least bit entertaining and I appreciate your time in viewing. And to all of you that have left your nice comments I will say thanks. Please know that they are truly valued.

airing some thoughts

$
0
0

I guess it's about time to get a little philosophical about my modeling and any other subject I deem appropriate for here. After all, and with deference to Leslie Gore, "it's my blog and I'll do what I want to". There's a lot that crosses my mind as I'm working on a build not the least of which is what I want the piece to turn out being. Often, as in life in general, 'the best laid plans.....' , or as some would say, Murphy's Law kicks in. Anything can change at a moments notice and alter the finest of intentions. This happens all too frequently in my modeling and I'm sure I'm not alone in sharing this fate. I try to insure against mistakes and what I like to refer to as 'material failure' and as I grow in my modeling, these mistakes become fewer. I have learned especially to take more time with things and have learned to recognize the limiting properties of materials (and myself, in the immortal words of Dirty Harry "a man's got to know his limitations"). Learning by experience to make different choices in techniques and materials from those that I first started using has been augmented with advice and tutorials from all different modeling genres. I've mentioned that military modelers have had a profound impression on my weathering before and larger scale vehicle modelers are very adept at scratch building and kit bashing. Model railroaders and diorama builders look at the world of miniatures in a completely different way and come up with techniques and practices that can benefit any kind of modeler. I have developed, at the very least into a good student (where was this propensity 50 years ago?)


Above you will notice a model of a 1940 Ford coupe. On seeing how larger scale modelers grind out the insides of a model to represent the cancerous rust around fenders and also how they make dented looking sheet metal, I decided to try some of their techniques on a 1/87 scale model. The base model here is a really awful injected molded piece from an outfit called Herka but the casting has been done by several others, most notable Tyco. The details are lacking and what is there can at best be considered barely acceptable but the initial shape, proportion and scale accuracy is pretty good. I cut the hood and grille area out and had to carve the headlight bezels into the front fenders. The engine, firewall and radiator came from the '40 Ford sedan model kit by Jordan. I wish I had a bunch of these little flathead V8's to fool around with.


You might remember my Model AA stake bed that has an exposed engine too. It's at this point in the writing that I realize that there is going to be a theme to the photos I show. Let's see what I come up with in showing the power plants on some of my models. Revealing the inner workings, so to speak. The Model AA motor is again a Jordan piece, this one from the deuce coupe kit they make. The photo below showing what the intended model for that motor is. All spiffed up with an Alcad 2 paint job. If I hadn't mentioned it before, this Alclad product is a super chrome finish. One needs to put down a good smooth black enamel finish on whatever you want chromed and then a very light coat of the Alclad 2 finish goes on. The Alclad is a lacquer based product and in effect dissolves a portion of the underlying black enamel to combine for a bright chrome.


I hearken back now to the days before I started weathering everything I built. This resides in a collection of another fellow and he did not want any weathering on it anyway. It is a resin model of a Kenworth C540 oilfield tractor. The model is from Diesel 87 and is quite nice with some photo etched details but a very heavy price tag. In kit form, it retails for $150.00. Add what I charged the gentleman to construct the model. It is a very impressive machine even in 1/87 scale though. The kit included the engine so as to be able to model it sans hood or covered. I added the steering column.
The Alloy Forms Constructor was in my post on dump trucks. The engine shown is the diesel 6 from the Herpa/Promotex Mack CH. You will notice some piping and a steering column added to the engine compartment here.


I haven't yet shown this next piece yet mostly because I have yet to get a photo that accurately displays the truck. For some reason the color or intensity of particular features of the truck just come out all wrong. I'll risk showing it anyway since it is a real nice model kit and the truck itself is a beaut. The resin kit comes from Don Mills models and is of the Mack FCSW quarry truck with chain drive.


Some time ago, I was given a super nice resin casting of the Cat c12 diesel motor with tranny. I couldn't figure out (or haven't yet) how to use this really great little model in a truck. But I did have the opportunity to utilize the transmission part to get a nice detailed look to the back side of the International Emeryville. Both the Cat engine and the Emeryville were graciously given to me by Bob Johnson.


One more example of the inner workings of a vehicle in this model that you have seen several variations on already in past postings. The Bucyrus Erie B2 steam units from Vintage Vehicles I've done without the cabin housing since the details on the boiler and engines is so nice. I made the piece on the left into a shallow dredging barge. And the right photo shows a lattice boom crane version.


Well I hope I didn't embarrass anyone with all this exposure. Perhaps I will cover up better next time.


And if I don't get back to this in the next few weeks, please all have a safe and enjoyable Holiday Season. Merry Christmas and Happy New Year 2009.

For Sale!

$
0
0


It's my pleasure to say that response here has been just overwhelming. In just the few days that I have had these models up for sale, I have sold all but the remaining and there is an interest in them already. So please be patient, I will need a little time to get more stuff together to place here. Keep looking back and I hope to have more soon.

I've been selling my models on ebay for some time now with mixed results. I'm often surprised at a very generous bid on something I'm just not that crazy about or doesn't perhaps have a lot into it. I'm equally surprised at pieces that I have poured my heart into and spent many hours getting what I feel is a super model (two words here) and have it command much less than expected. Be that as it may, I enjoy the building process and what I gain in money usually goes back into modeling supplies. The thought of my models being in collections and layouts all over the world intrigues me to no end and is very gratifying to say the least. It satisfies the spiritual side in a way, the knowledge that folks from every part of the globe appreciate what it is that I have decided to fill the hours of my leisure. And in an attempt to be able to present a model in a more personal setting, I've decided to place a few here.
So let's get the transactional verbiage out of the way and then I'll get on with trying to separate you from your shekels. After receiving my first inquiry about the sale of a model, it occurred to me that one must leave some contact information. So please either leave an email address or contact me directly at cfesmire@midcoast.com , thanks. I accept Paypal only, merely as a convenience and because I can get one's model to them in a more timely fashion. Upon receipt of payment the model will go out that week. Shipping costs to the Continental U.S. and Canada for vehicles and packages under 1 lb. is $5.00 straight across the board. Any different will be noted in the model description. Shipping elsewhere in the world will be computed when any request is made. My return policy is this: if there's something wrong with the model when it arrives at your location, I will buy it back, and pay the return shipping as well. All that I ask is that you confirm this somehow either in an email attachment or a mailed photo. I want you to be happy with what you receive from me.

I will also do commissioned work with a caveat. If you show me a photo and say that's the vehicle I want, I may exercise some "artistic license" on the resulting model. Not always is an exact year, make or model of a vehicle available. And often certain accessories that can't be scratch built or available are not to be had either. The result is either no model or a compromise in which I would discuss it with the potential buyer prior to any agreement. I will estimate any model cost before hand and will stay true to that figure unless changes are requested by the buyer during construction. None of this is meant to scare you away from having me build a custom piece for you but just to keep everyone happy knowing what is what.
I'll be removing models on display as (and if) the are sold, and adding new one's as I choose so hopefully this thread will be an active one. A comment left will be promptly replied to whether it's just a question or a purchase.

1930's tractor trailer - $55.00


Another of the Roco Zis-5's this time in a highway tractor with integral sleeper. The cab has been extended and running lights and horn have been added. The trailer is an exterior post round front suitable for the 30's. It comes from a Sylvan Scale resin kit and all have been moderately weathered.


Ford Model AA canopy express - $34.00


This is a modified Busch Model AA closed van with the sides removed and rolled up canvas added. The exposed flat head engine and headlamps come from Jordan Miniatures.


Steam launch diorama - SOLD
1930's transfer/express truck - SOLD


Small Crawler diorama - Sold


1947 Ford cab over tow truck - SOLD


Ford Model A pickup - SOLD


Ford Model AA flatbed - Sold


1953 Ford F 600 wrecker - Sold


1930 Autocar w. lowboy and shovel - SOLD

Roadside Advertisement display - SOLD

1937 Chevy pickup mini diorama - SOLD


International KB11 logging truck - SOLD


1937 Ford cabover - SOLD


Mack BX dump - SOLD


1965 Ford F850 hay/straw truck with load - SOLD

Ford AA wrecker: SOLD

1937 Chevy wrecker - SOLD

IH F230 - SOLD


Pair of 1940 Fords with hood - SOLD
Don't forget that clicking on these photos that accompany the text will bring up a larger picture. Please excuse the long loading times when clicking back to the blog. I will be putting fewer blogs on the same page to try to speed up loading times. Thanks.

What's new on the bench

$
0
0

Lately things have been slow on the modeling bench. With summers final arrival and now it's soon to be demise, I'm trying to squeeze as much outdoor activity in as possible. But I have managed to get out a few decent pieces that have already been spoken for.

This first little guy is a dump truck from the 50's in the White 4000, a resin kit offered by Sylvan Scale. A good friend Ralph Ratcliffe, and one of the best modelers I know is now presenting a line of resin castings which include several 1/87 scale pieces. The really beautifully done wheels and tires are featured on this truck and I think they make this model. The bed is also from Sylvan and I added wooden scuff boards and a gate release lever.


Now for the kind of model I truly enjoy building. This Mack FCSW chain drive quarry truck from the 40's is a resin kit from Don Mills Models. Now if you're paying any attention to some of my other posts, you might remember this truck done up in a water truck configuration by Joe Enriquez. Well this is nothing like Joe's truck in that it is pretty much box stock and Joe's was almost totally rebuilt from scratch. But I love these big old brutes and had a lot of fun with this build. I have cut the hood sides out and replaced the cast faux mesh with a real mesh screening and added a grille guard to the kit. The rest of the build consisted of applying a few different weathering techniques.


This is an attempt at a rail car. Now I'm a total ignoramus when it comes to rail related models so I've definitely taken some artistic license here and went with what few photos of a prototype I could find. The base model is from Jordan Miniatures of a 1934 Ford school bus. The bed was covered in wood and a wire rack has been added over the windshield. This sits on standard gauge HO track. The roof has been covered in tissue to give it a canvas texture and the flathead V8 which was introduced the year before is exposed.


OK, back to the bench.

Repeat Performances

$
0
0

I made note on the post entitled "what's new on the bench" that if I really take to a model, I'll do it again (and in some cases again and again and.....). This is what you are about to see. I've already shown some examples of this but here are a few not too old.


The Model TT has been done in every scale in every medium, even solid wood. Well this one has a little wood in it but the base model is the Jordan plastic kit. The hood sides have been removed as well as the doors from the original kit. And the deck is uh... wood.


This next TT was an disaster turned OK. I had just finished the truck and was impatient to take photos. So to dry the headlights from the white glue look to clear, I turned the hairdryer loose on it. Within seconds the front wheels, axle and all, dropped to the floor in a droopy mess. Hence, the cinder block. I aged it a bit more and came up with this. Unfortunately, I don't have a lot of good photos of this and it was sold as part of the boathouse diorama.

The roof of the truck has been covered in tissue to be able to simulate a ripped top.


Now to the Model TT at the top of the post. The tanker has the tank body from the Jordan Model AA on it and the engine has been exposed. That's it! Oh, I cover all the roofs of trucks like this in tissue paper for the texture.


Here's a unique take on the T. I found a photo of an old horse hauler and decided to use the Model T for it. The bed is built from styrene. But as often as I've made a horse's ass of myself, I can't seem to model one.


fellow 1/87 scale modelers

$
0
0
It was suggested by another modeler that I put a section up for other folks that possess this strange affliction that makes us build these little models. From what I can see, we suffering from the addiction can sometimes be totally consumed so that large portions of our day is filled with thoughts of our hobby. So this posting will be about some other fanatics but myself.


It has been said recently that the Mack FCSW water truck by Joe Enriquez is the finest example of 1/87 scale vehicle modeling. I would agree wholeheartedly. Joe took the basic Don Mills resin kit and totally re fabricated the majority of it. The chassis is scratch built complete with plumbing, wiring and rivet detail. In the photos you can see just how extensive the scratch building is evidenced by the white styrene and metal. The original kit parts are of the darker colored resin. You see, Joe just isn't happy with the level of detail presented even by such a great kit as the Don Mills one. I show a photo of the kit grille and what Joe has fabricated to be more realistic and finely detailed. This is the level of craftsmanship Joe carries throughout the entire build.


The red tractor on bare chassis is a Mack LTL also a Don Mills kit that Joe "altered". And the Kenworth C500B oilfield truck is based on a Dennis Aust resin kit with a scratch built trailer. Now I could fill pages with Joe's work and each model is as jaw dropping as the next but I'll let you see for yourself by going to his picture site that can be found here. I have to add that in addition to being one of the finest modelers in any scale, Joe's a great fellow and has become a good friend. I'm proud to present Joe as the first guest modeler on the blog here.


Lurking in the shadows

$
0
0


I like the idea of displaying the interior of buildings but could never quite get thrilled with the whole concept of having to remove the roof to see what's inside. To try to solve this dilemma, I though I might just do an interior and then not bother with the outside of the structure. I've built this old barn interior from my memory of the countless old one's I've been in and worked on over the years. Several of them my own. Now while this structure is not entirely accurate prototypically, I was more interested in conveying the feel and ambiance that one gets inside some of these massive old buildings. What I came up with is a shadow box diorama that will totally encase the exterior and force the viewer's perspective. I simply built the barn interior cut on a diagonal to get the most viewing area.


I started by cutting some clear white pine strips to scale and half lapped all the joints on the structural members. Then I boarded it all in with individual boards including the floor. I used a Titebond waterproof glue for reasons that will be apparent. To show where this is going, I made a frame of cherry wood that will be the front of the box.


Now the reason for the waterproof glue is that I wet the entire structure with water and shot it with my airbrush loaded with RR tie brown and grimy black mixed 50/50 and thinned with Windex to go through the airbrush. I wanted to make sure that I got good coverage and didn't want it all to be too dark. As it was, it did come out a little too dark. So when cleaning the airbrush, I shot it again with the dirty water mix, drained it off and without moving it for fear of it falling apart, dried it with the hairdryer. This was the result of that, and the glue did a great job of resisting all the wetness. Everything is very solid. I also brush painted with some white acrylic craft paint, the back corner to simulate the old milking parlor.


The windows are Tichy injected molded plastic. I constructed the box which will have a satin black finish and while waiting for it to dry, decided to complete the hay loft and add the details to the interior. The straw is shaved hemp rope glued to blocks of wood and strewn around. What I believe will be the vehicle I end up using is a 1937 Chevy pickup from Sylvan Scale. Most of the details are cast metal pieces from the parts box, pieces of old watch parts and whatever I could dream up that I could make from scratch. Further coloring has been done mostly with artists chalks. At this point, I am wiring the box with 3V LED spots that look great to the naked eye but photograph poorly so I won't be trying to show the finished product interior here. I still have some molding to go on the front to surround the cherry but essentially what you will see below are finished photos of the interior. Please don't forget that clicking on these images will bring up a larger photo. Thanks for looking and enjoy.


Getting ready for the big show

$
0
0


First of all, I'm sorry to have taken so much time off from doing these blogs but getting ready for winter has been a real time suck this year.
One event that I look forward to each year with great enthusiasm is the train show in Springfield, Mass. at "the big E". The Amherst Railway club takes over the Eastern States Exposition annually to present what I've heard is the largest train show in the east. Last year several officials from the event offered to work something out with the 1/87 Vehicle Club in order to introduce the train crowd to what vehicle modelers in HO scale are up to. They have been gracious enough to give us several spaces in order to do so. A core group in the club have organized to make a presentation and one of the ideas is to make a system of modules that can be coupled together much like the way Free-Mo rail modelers do. The difference being that instead of coupling track, we will be using a roadway surface continuity between the modules. The details and specification have yet to be ironed out.
I have chosen to do a New England farm scene that will enable me to display a lot of agricultural vehicles. This will mean I have to get to work on several pieces that have been sitting in boxes for some time now as well as scratch building most of the module itself. In my exuberance to get started, I've built a small farmhouse out of styrene that resembles some of the old center chimney capes I am familiar with. My own house is just that built in 1830 and my model structure is a slightly scaled down version of it. OK so here's where I'm going with it and I will be doing a lot of step by step progress in this entry.
I began with Evergreen styrene clapboard with a .040" spacing. After drawing the building on the computer and printing out templates on Manila card stock, I cut out the walls of the building with window and door openings. Some time ago, I purchased a collection of Tichy injected molded plastic doors and windows so I have a large selection to chose from. To the gable end walls, I glued .060" square rod to make up the corners and added a rake board of the same rod.


Many of the old farms here in Maine across New Hampshire and over into Vermont are connected affairs that enabled the farm occupants to go from house to barn without having to venture outside. For my little farm, I constructed a connecting el, also of styrene. This time I use a .060 spaced clapboard and scored the courses vertically to replicate cedar shakes. I have not found a suitable commercially available shake pattern in the scale and decided to give this technique a try. And while it is time consuming and a bit mind numbing, I like the results so far. The shed el will have a standing seam roof that I fabricated from thin brass foil scored on the back for the seams. The small window will have an open sash that I have omitted for the present since I'm sure I would break it off in the build process.


The chimney is a large square affair made from Evergreen brick pattern mitred at the corners. a few bricks have been added at the top to support a large flat stone for the chimney cap. The mortar which will remain a bright white similar to the white cement, lime and white sand mix used years ago was done with artists chalks and alcohol and when dry I simply wiped excess away with a finger. This still needs to be flashed to the shingles. I will be trying to do this with scotch tape painted. The roof shingles are asphalt imitators from GC Laser that are a black felt paper and a ridge cap will also be added and then all will be painted.


The next photo shows the shake pattern stop part of the way across the wall. This will be where the barn wall will start and make up the connection. So far I have drawn a fairly large barn that will be constructed of wood but have not begun construction yet. I want to finish the glass in the windows and some kind of window treatment like drapes so I can fasten the house roof. This will complete the house until it gets "planted" on the module.


I've really got the itch to get going on the barn so I'm trying to get the farmhouse to the point where there's nothing more to do until I plant the structure on it's base. So I glassed in the windows with clear acrylic and added some curtains. They are 1 ply tissue dipped in 50/50 white glue and water. Using the tissue gave me an idea to use it also for the chimney flashing that I would like to have look like lead. So I cut out the pieces I would need and brushed some of the water/glue in the appropriate spots on the chimney and set the pieces. Painted when dry. The capstone on the chimney is a piece of Vermont slate. This material has a grain to it much like wood and can be split very thin. I still have to finish capping 1/2 of the ridge but the individual ridge shingles are a pain and I needed a break.


This may be all I do for a while on this project and anything further I may post as a part 2 (these posts get too long and adding photos get's a bit time consuming) So that's it for now but keep looking back for more soon.


Well I couldn't leave well enough alone and decided to add some color to the clapboards of the structure. I used a powdered paint product called buttermilk paint that I use in my business for reproduction furniture that is mixed with water. I made a wash of this paint substituting alcohol for the water. The roof cap has been completed and there is now a brick foundation making the farmhouse ready to be planted on the module and waiting for the construction of the barn. I'm also anxious to get started on some vehicles for this project. After all they are what the focus of this whole project is in the first place.

Where the heck have I been?

$
0
0


Well I've been right here at home in Maine for the past few months but personal life has taken me through a few detours from my modeling. First and most important is that my wife has undergone a major surgery and I had to make some changes in schedule. Cleaning house, preparing meals and general care giving has replaced sitting at my model bench and the computer. To set minds at ease, my wife is recovering well and will be back to her energetic and active self quite soon. The other chief reason for my hiatus is the lack of heat in my office/work area. Trying to model in 1/87 scale is next to impossible when shivering from the invasive Maine winter cold. My solutions to this have been temporary and expensive. OK, so much for my excuse list and now on to what I have been able to accomplish.


I was able to complete the module for the Springfield show and got some terrific response to it at the show. It was great to meet and speak with all those there and discuss 1/87 scale modeling for the three days. I added a small rural gas station to the module which is constructed of the same Evergreen styrene clapboard as the farm house. I would invite you to view some photos of it as it was displayed at the show on the new Route 87 web site that was created to give modelers a chance to participate in this endeavor. Many thanks to Andy Madden for his work on this site.


I've had a figure of a lady carrying laundry for quite some time and had to work her into a scene so I made a clothes line and some hanging wash for the back of the farmhouse. The shirt and pants are painted tissue paper. There were several new vehicles made that I placed on the diorama that include a Model AA wrecker with a little more accurate version of the Weaver Auto Crane than what I have done before. This is of course the Jordan Ford as the base model. I also built a wrecker bed and wrecker unit for the Sylvan '47 Ford cab over out of styrene. And lastly, what would any respectable farm be without a decent truck for hay, grain or livestock transport? For this I used the Sylvan '50 Chevy cab over with a metal sided body suitable for any of these duties. I went to my model building friend Ralph Ratcliffe for the great set of wheels for this model.


Aside from all that, there are some pieces on the workbench ready to be finished and lots of unbuilt kits sitting in the shelves at the moment. Hopefully with the advent of warmer weather I will be back in full swing soon. Thanks to all who have written with their concerns and well wishes. More to come.....

Roco Zis 5, all gone.

$
0
0

I have mentioned the Roco/Komo model of the Zis 5 Russian truck. To quickly review, several U.S. truck manufacturers banded together in 1927 and transported all the tooling necessary to build what most closely resembled the Autocar truck of the day. The model is a good representation of U.S. trucks spanning almost a decade. It sold originally for around $5.00 but recently has seen prices break the $30.00 mark, NIB. I have been asked if there existed a place where one could see all the variants of this model I have created so here 'ya go. My first Zis (above) was just a paint job.


Because the first few that I bought were rather cheap (I remember first paying around $6 each) I used them to practice thing like weathering. The one above was just that, with a bare chassis I tried out several rust techniques. I was really pleased with the way this turned out.


More rust with a simple wooden flatbed and gas engine powered pump for a load


The two above are attempts at making the Zis 5 a highway tractor. In both instances, it was simply a matter of adding a fifth wheel. The flatdeck trailer with the granite block load is scratch built from wood and styrene. The lowboy is a cast metal and wood kit from Rio Grande. It is hauling a Bucyrus Erie steam shovel crawler from Vintage Vehicles. Now newly released by Jordan Miniatures. Please don't hesitate to click on the photos for enlarged versions.


I've gone through a period of making tow trucks. The tow units on these are made from styrene and watch parts.


Then I really became intrigued with the whole boom/cable thing. I saw this set up on a historical website from Wisconsin. It's a telephone pole/piling setting truck. The unique feature on this truck is that the cable goes under the bed of the truck from the winch to a sheave in the front of the bed and then up to the boom sheave. This is all made from styrene and watch parts.


I should mention now a very nice man by the name of Fred Oxner, who has been buying many of my trucks. Fred was kind enough to send me several of the Zis 5's that you see here. Many thanks to Fred, may he live long and enjoy his models. Fred has wanted one of these barrel trucks since I first built this green one but I haven't been able to get the parts together yet. I have not forgotten Fred! The mixer unit on the back here is modified to fit the truck from a cast metal kit by Rio Grande Models.


I had to give the open door trick a try and came up with the mini scene above with the driver inspecting what the bump was. Surprise! The skunk is a piece of painted brass foil. After seeing it, I had a request for another stake bodied truck which is what you see on the right. Both sport the stake bed from Jordan that comes with their Model TT Ford.


Not done yet with these. Jordan has this great little tanker unit that comes with the Model AA Ford. Couldn't resist the opportunity to pair it up with the Zis for the kerosene truck. And the tanker unit on the yellow one in the middle, is a resin casting made specifically for the Zis 5 by a Czech company. This was another chance to use a weathering technique. That of chipped paint. The third all red tanker was a scratch built thing with brass foil stretched over a wooden dowel.


The last I have to show is made from one of the bed configurations that come with the original model. It's a wood sided bed with a canvas top. I cut one of the sides to the open position, discarded the plastic canvas and made hoops and a canvas top from tissue paper. I imagine it as a vegetable hucksters truck.

Well that's my affair with the RocoZis 5 so far. I hope to have more. I suppose it's apparent that I like modeling it. Thanks for looking.

A few new ones

$
0
0


Had some time to put a few new pieces together. I seem to be stuck in the 30's for some reason but it has nothing to do with depression. I just recently had a short but very nice visit by Fred Oxner and his wife and received quite a few more RocoZis 5's so it doesn't look like I'll be getting them out of my system for a while. I have to add that I'm really itching to do something modern soon however.
But that is not the case with these latest builds. The one pictured above is the Ford Model AA by Busch that has been transformed from a van to a canopy express wagon. These were often used by fruit and vegetable hucksters. My grandfather's brother used one (an old Chevy in his case) back in the 40's and 50's that he filled in south Jersey and would serve suburban Phila. neighborhoods. It was a simple matter of cutting the van side openings and adding the roll down canvas sides. I also opened the engine compartment and use the 4 cylinder from Jordan. I should remember to dust things off before photographing them.


And now it's back to Zis 5's for the next two. As promised, I finally got to build a barrel truck for Fred and was pleased to present it to him when he visited. A pleasant surprise gift from Fred in addition to the Roco pieces was the Rio Grande cast metal mixer unit kit . A subtle message there I'm sure. The piece most recently finished utilizes the mixer barrel from SSLtd. which is also cast metal.


The last of this post is something I saw in a photo of an express truck on a historical site. The body is actually one of the body configurations that come with the Roco model. I cut the front half out and added a wood floor, interior partition and the bars int the openings. The crooked looking horizontal piece was supposed to represent a leather strap but I'm not sure it's very convincing. The rolled up canvas side curtains are tissue paper. This turned out to be a personal favorite. Been playing around with camera settings here, be forewarned, these are large files if opened (but worth it).


Newer yet

$
0
0

Geez, my imagination just runs dry when it comes to putting a title on these postings. Lord knows that if it wasn't for my wife, our four children might still be nameless. Well be that as it may, the title is at least accurate. I have managed to step into a slightly newer era in my last two pieces. The one I had the most fun with was this Mack DM which is distinct in it's offset cab. The model is a resin casting from Ralph Ratcliffe and as a matter of fact so is just about everything seen on this model. With the exception of the tractor wheels (Roco tires on Herpa rims) the battery box, fuel tanks and air cleaner are all from Ralph. As is the 25' gravel trailer he now offers in kit form. The cab is mounted on an Athearn Chassis with corrugated metal quarter fenders added. The light bar is from Busch.


And speaking of Athearn, they are now releasing the Ford F850 boom truck in kit form. Thanks to Trip Aiken at Truck Stop Models I recently acquired a kit (or two). These are nicely cast with a lot of parts so painting individual parts of the model is easier. I also have remarked before that while the Athearn factory paint, as nice as it is, can be a little heavy handed and does hide some detail on parts. This coupled with the fact that the boom and bed lend themselves to some serious kit bashing make them very attractive to modelers. I hope the trend in offering their ready to roll line in kit form continues.


OK so that's the newest yet. Hope to have more soon and thank you for visiting.

I love big Macks

$
0
0

With a large order of fries to go please. These resin castings of Ralph Ratcliffe make for such a decent model. They are so precise and crisp in detail and proportion. And Ralph seems to be expanding his line quite frequently. This truck was a challenge. There aren't a lot of them out on the road. And when you do see them, they are DOT snow plows. Well I just wasn't into a snow plow and I saw a photo of a septic tank delivery truck that was an RM Mack. Mine hasn't been relegated to any particular duty yet but I just had to do something with these very cool equipment tires for some of the photographs.The build was simple in terms of the cab and chassis. The KibriUnimog lent itself for four wheel drive in a large truck capability. I added the step tank on the driver side and hydraulic controls just behind for working the gantry travel which is a three stage telescoping ram. The road side has two steps and a bar step added and the tool/chain box under the bed.


The exhaust is a piece of aluminum tubing bent with a piece of heat shrink tubing for the muffler. The small electric winch is a Dennis Aust casting. A smaller rail has been added next to the boom for the electric wire to travel on as the boom is extended and withdrawn. Steel wire was used for the hydraulic lines. It bends easy but retains its shape well and holds fast when glued unlike the lead line I had been using. The wheels on the winch come from Vector Cut which I will go into detail at the end of the post here if time allows tonight.
Various steps, hooks and grabs were put on the model to try to bring it to a realistic look. The tires and planetary rims are from Roco. On the cab are stainless mirrors from Plano and the light bar from Busch. I particularly like the back of the Unimog chassis under the bed here. Oh, the license plate? New Mexico.
I broke the striping decal on the front bumper and made the cracks in it to be rusted through. Also added the guide poles to the bumper. I ran the thread for the wire through my fingers coated with moustache wax and glued them to small discs on the wire guide bar made from styrene rod sliced thin. The entire model was painted with RR tie brown in an acrylic. Then all the black you see was painted with a dirty brush thinner with a few drops of Floquil engine black and the airbrush with no paint blew the wet thinner wash. The cab was done in Floquil caboose red. All bright chrome work was done and all allowed to dry for a day. Then a black acrylic wash went on the entire model followed by a flat clear lacquer. Then a wash of burnt umber with highlights of raw umber on particular spots while the burnt umber wash was still wet. I mix food coloring with white wood glue for my amber and red lighting and just wood glue for clear lenses on the headlights. You might notice I took photos before the wood glue dried clear.


I've been asked several times to walk folks through one of my builds and I guess that was pretty painless so maybe I'll do it again sometime. Now with regard to the above mentioned Vector Cut. These folks are laser cutting on mat board some of the finest and most highly detailed pieces in 1/87. I have purchased the tool selection with spanner wrenches, pliers and open end wrenches that have to be seen in person to appreciate. I also bought their wheel card, and a card with engine parts like gaskets, fans and fan belts. But the most impressive is the card with a junk yard assortment that I have finished a few pieces of below. The door was covered in Bare Metal Foil and torn. I suppose I should have located the tear in a better place but the effect will be worth using somewhere.


Well this brings to an end another exciting adventure. Thanks for looking.


Winter is upon us

$
0
0

And with it comes the dreaded four letter word here in the north country - Snow. Managing the highways of our white landscape has always been a challenge and expense. Surprisingly, much hasn't changed in the way we uncover the asphalt over the years. In doing my research, I've noticed that the highway snow removal truck, while changing in models from year to year, still use the plow to scrape up and push the snow to the side. And so the truck shown here could very well have been outfitted the same as those used several years before and many years after it. The model shown is a 1953 Oshkosh with the Comfo-Vision cab. The body style much resembles the FWD contribution of the same vintage. It is offered in the scale as a solid resin cab from Sheepscot Scale. I used the Sheepscot chassis and wheels also here but the rear wheel differential and spring combination come from Ralph Ratcliffe. The front push frame is mostly styrene. I've been using several different solvent glues for plastic. Good old Testors plastic cement is my choice for Evergreen styrene to Evergreen styrene but when using the Plastruct products I switch to Bondene. It works well for several manufacturers plastic. For instant bonds on styrene, Tenax 7 is another favorite. The light grey plastic on the wing push frame is from a Tichy coal chute kit.


You might notice that the wheels are darkened. They have no paint to hide detail on them but have been treated with a combination of Hydrogen Peroxide and Muriatic Acid (20/80 mix respectively). This solution darkens most pot metals to the color shown. A fuel tank from the parts box was added and all was painted Poly-Scale RR tie brown.


The cab was also painted in the RR tie brown and then a coat of Floquil UP Armor yellow was sprayed. Mirrors and headlamps were added and the chrome work was done. A small resin dump body from Sylvan Scale was painted black and wooden scuff boards were applied.


All of the chassis and push frame had a coat of dirty brush thinner mixed with engine black put on and while still wet were blown with the airbrush with no paint. The rotating beacon is cast metal with a drop of food coloring mixed with wood glue for the lens. The entire model was then washed with acrylic burnt umber and Windex.


Finally the chalks came out along with the wood glue and food coloring for lenses to finish the model. For all the measurements and angles needed to make this as prototypically correct I used the sheet provided by Sheepscot for building the Frink snowplow. I hope to add the plows to this truck eventually but thought it looked good sans plow. Now if I can only get one more winter out of my old snow blower.


On a Jordan jag

$
0
0


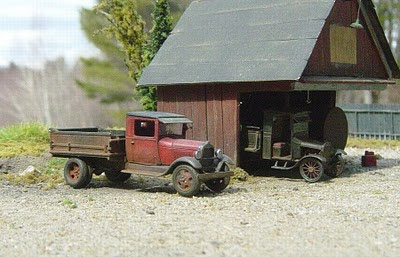
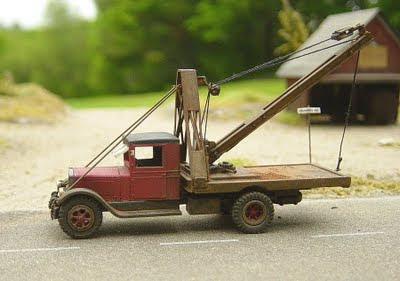
It was recommended to me years ago when I got into this hobby that if I was going to do any of the Jordan Products kits that I do more than one in a row. There's a mindset that one needs to get into when building these little guys. I've found that it does help, in fact, to stay with the flow. These are inexpensive injected molded plastic kits with a terrific amount of detail for their size. Steam era guys love these models and they've been around for a long time. But building them correctly takes a good deal of patience and a steady hand (lay off the coffee for the day). I don't build them like the directions say to and my methods of painting them is not what most do either. I recently acquired several so let's walk through the process sans in-progress shots unfortunately (sorry!).


The first step is to look at the directions and familiarize yourself with the parts. Once you have a good general idea of where and how everything fits, clean off any flash and parting lines. I use a #11 blade to cut and scrape the parts clean from the sprue. This may be the most important step you take with these and great care must be taken not to damage anything during this process. Now, a good styrene plastic solvent glue is probably your best bet on these since some of the contact points are so tiny. Solvent glue actually welds the parts together where an ACC (super glue) would not give the strongest bond. Once entirely cleaned of excess plastic and pieces are shaped to what they need to be, a simple washing of the parts helps for a good strong connection at glue joints. I simply drop pieces in a cup with alcohol and pull them out as I go. They dry quickly and the alcohol seems to cut any mold release and oils from my fingers. It also washes away the fuzzies created by the scraping with a gentle scrub with an old, out-of-use toothbrush (emphasizing "old, out-of-use" here please).


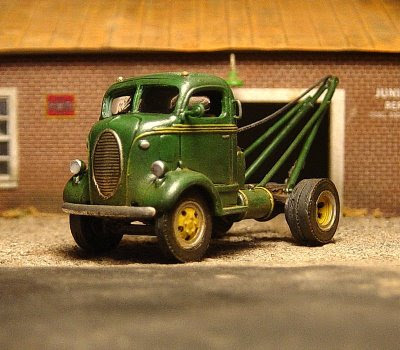
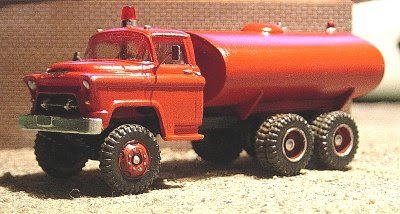
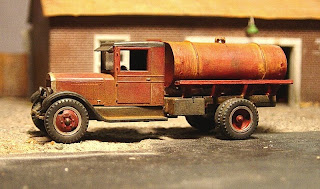
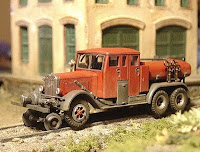
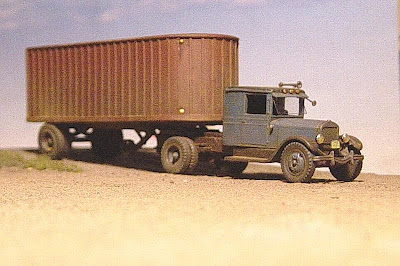
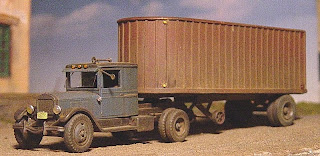
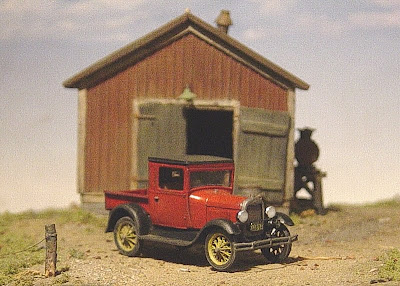
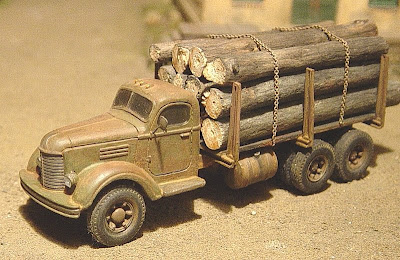
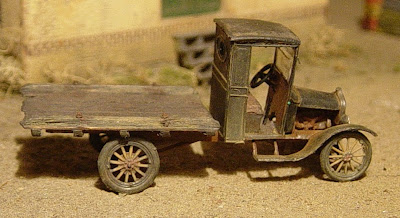
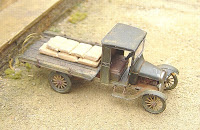
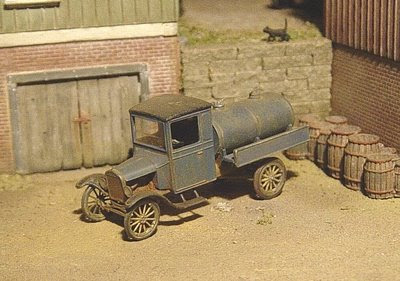
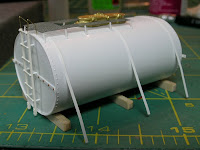
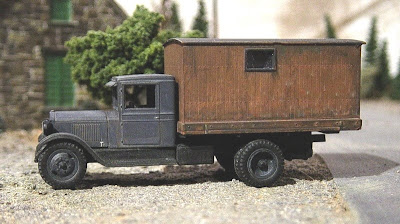
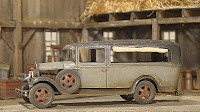
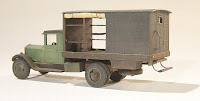
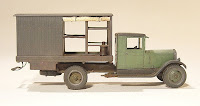
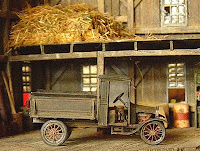
Kit bashing these Jordan pieces are quite easy. The tanker body from the Model AA fits handily on the Model TT and the Model TT stake bed fits just as easily on the Model AA and so on. The Model TT has a nicely done flat head engine that can be exposed merely by leaving the sides of the hood off and can quickly be adapted for the Model AA. I also found that to change the look on these models may be a simple as cutting the doors off. The cab interior is detailed enough to make them quite presentable in this manner.


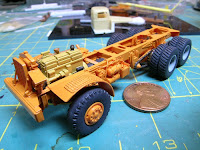
I glue sub-assemblies up such as the chassis with suspensions, or intricate bodies. And never attach wheels to anything until the very end. This is where I differ from the directions. They would have you gluing the entire model together and hand painting the details. I find the raw plastic to be (for lack of a better word) translucent looking. So I paint the sub-assemblies before final assembly careful not to get paint where gluing would be necessary for the final attachments. Again for instance, where the wheels attach to the axles or where the body connects to the chassis. This is difficult if you use an airbrush like I do for a lot of painting. There are several ways to avoid getting paint where you don't want it. I use a product called "blue tack" which is a very sticky putty. I pull a small chunk of it off and will mold it around axle ends. For areas like the top of the chassis where bodies connect, I will put a dab of rubber cement that can easily be pulled off after painting to reveal the raw plastic. I will now paint bodies and such with the airbrush. Wheels are usually painted by hand. I should mention that almost every model I build anymore will be painted with a coat of a dark brown color first, everything! My favorite choice of color is the acrylic PolyScale RR tie brown and yes it is difficult to airbrush but keep in mind that total coverage is not usually necessary at this step in the game.

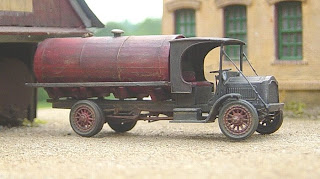
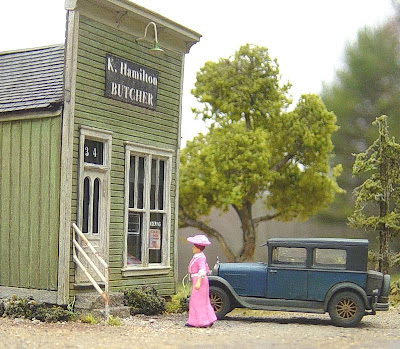
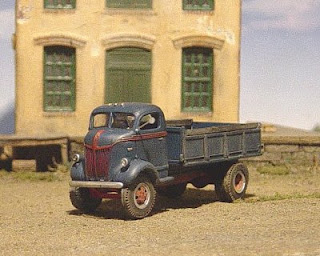
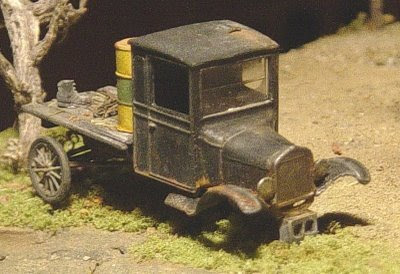
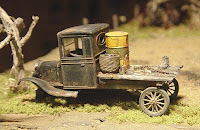
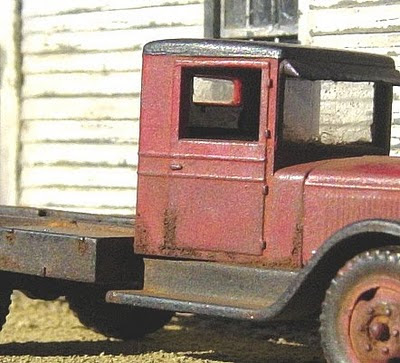
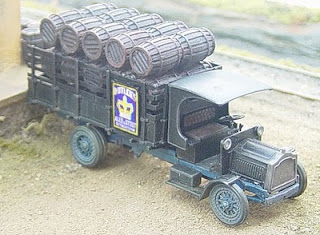
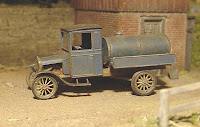
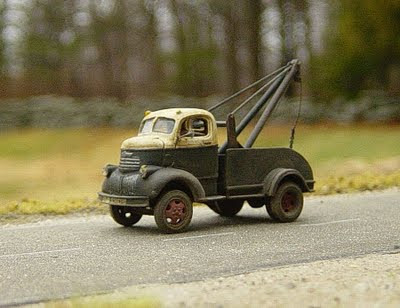
This paint dries very quickly (one of the reasons it is tough to airbrush, it has a tendency to dry in the orifice of the airbrush as you work). Thinning (only very slightly!) with Windex helps this. When dry, I will put finish coats on. For the undercarriage, it isn't necessary to do anything else to it except, since most of the chassis sub-assembly has fenders attached, I paint the fenders by hand. Here's where a little trick I learned from Ken Hamilton's book comes in. For black fenders on these models (or any body part painted black for that matter), I paint the model with some old dirty brush thinner with a little Floquil engine black mixed in. Then I disconnect the paint cup while the model is still wet and blow it with just the air from the airbrush. Some of the brown undercoat will show through in a random pattern creating the nifty patina that the original paint on these real vintage vehicles have. It doesn't matter that some of the blackish mixture has seeped onto the undercarriage here so don't fret. I treat the cab and body the same if black is the color I want. If not, I paint them (again, usually with the airbrush) the color of choice. Caution should be taken not to apply too much paint put only enough paint on for minimal coverage. Some of the brown undercoat should be visible in places like panel lines and deep crevices. I might even say that the model isn't really painted but merely misted. This is the reason I do not use spray cans (rattle cans, fizz bombs, you choose what you want to call them) . They lay out entirely too much paint to get the look I want on these tiny models.


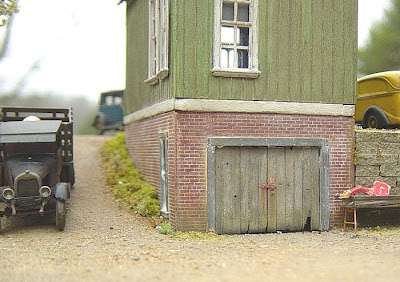
Let these enamels dry well. Since not a lot of paint has been applied, there should be no fear of lifting the acrylic brown undercoat and drying times are cut down as well. When dry, you can start final assembly. Peel off the masks you used and begin to detail paint by hand. I paint the radiators and anything else that one would call bright work (chrome) the RR tie brown. A little trick I learned from the talented Rod Reilly is to then use a soft graphite to give these areas the metal look. After painting the tires a dark gray (never black) I use a pencil to color the rim where it meets the rubber. Hit the radiator, door handles, hinges on tailgates, gas caps etc., any part that is to be bright metal with the pencil. It is so much easier to control than trying to paint silver and the look is that of aged chrome. The only exception for this technique is the recess in the headlights which I do paint silver. Caution should be taken from this point on not to touch these areas since the graphite from the pencil will easily be rubbed off. In fact during the process of applying washes much of this look disappears but retouching again afterwards is easy. I do not use the clear headlight lenses provided with the kit but place a drop of white wood glue carefully in the recess provided on most of the lights in their kits. I should add at this point that
this technique of doing headlights applies to models of all types.


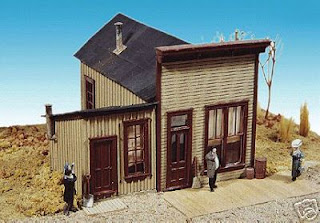
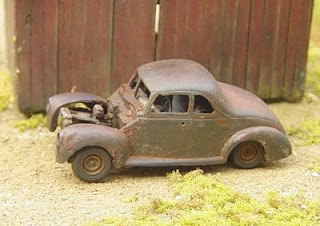
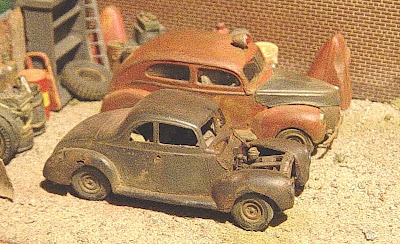
At this stage you may have a very respectable model. But I can't leave well enough alone and feel the need to age the models even further. These next steps can be used with just about any kind of model here. So I start with a series of washes. My first wash on any color other than black is a panel wash with inexpensive craft paints (Folk Art, Ceramcoat, Apple Barrel) in a black mixed with windshield washer fluid. These dry completely flat which is a plus for the next phase, that of chalking. Often I will seal with dullcoat (again only misting) between coats of washes so the subsequent wash doesn't lift or mix with previous ones. Next color wash would be burnt umber followed by the final wash of raw sienna. I have several of the small plastic trays that Preiser figures come in that I use when doing washes. I fill each com
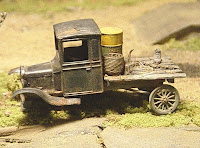
partment with clean washer fluid and keep a paper towel handy. In order to get the right amount of color in the washes, I will take a dollop of the craft paint and put it on the tray. With a dampened brush I pick up some of the color and mix it in the fluid and then apply it to the model. If too much color, I empty the contents of the brush on the paper towel, wick away the wash from the model, dip in some clean fluid and wash the model again. Trial and error is the process here and I may repeat this several times before I get the wash to look how I want it. I do not want drip marks to be seen and I can actually place undiluted paint on specific spots while the wash is still wet and concentrate the color in these areas without sharp delineations. Particular areas where this is effective are rust streaks and dark stains going down the sides of fuel tanks. While the area is still wet, place the color at the origin of a streak and drag it downwards vertically. The color will dissipate in the wet leaving no trace of a brush mark.

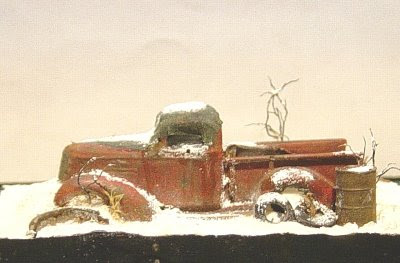
The next step in my finishing of these models uses artist chalks. I have not tried commercially available weathering powders and hope to soon but this is what I do in the mean time. Yellow ochre is my choice for dust and dirt in and around the bottom of the models especially the tire/wheel area. I use a light gray on the top of them sparingly to simulate faded paint. And rusted areas get a very light coating of real rust powder made with steel wool. Exhaust pipes get a light hit with Indian red.
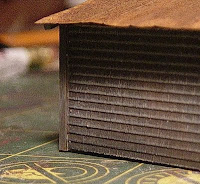
Barely noticeable in most of the photos is a texture on the roof areas of the Model T's. This can be accomplished one of two ways. First and easiest is when you paint the roof (I prefer PolyScale Grimy Black) while the paint is still wet (move fast, remember this acrylic stuff dries fast) sprinkle some dark gray or black powdered chalk into the wet paint. The second method is what I do most of the time but takes some time and effort to get right. Cut a small piece of toilet paper and separate the plies. Lay one ply on the roof and place a drop of a 50/50 mix of water/wood glue mixture on the paper. Take a wetted brush and manipulate the paper over the casting creating small folds on the corners and making sure that it lays flat. When dry carefully cut the excess away following the lines of the model roof and paint. This method allows for a good textured look and also can be used to create damage to this area of the model if so desired.


Lastly, I will do turn signals (virtually non existent in the era most represented by the Jordan line but worth mentioning here) with yellow food coloring mixed with wood glue and red food coloring used for brake lights. I go back and check bright work with the pencil and touch up areas that have disappeared and wait for everything to dry and the models are ready to be photographed.

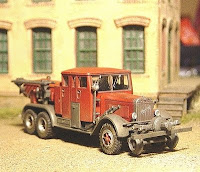
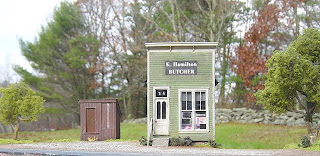
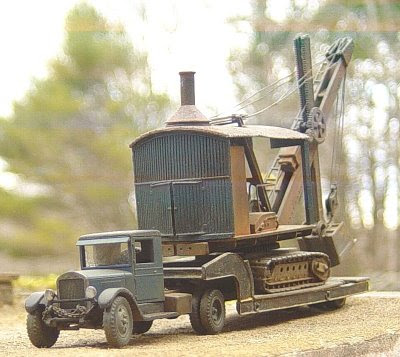
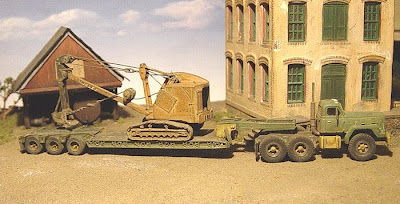
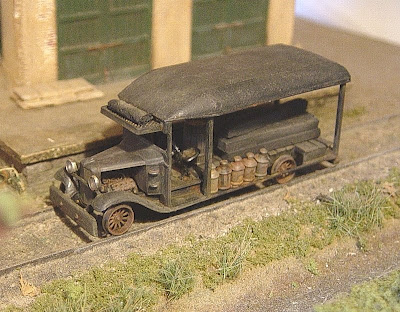
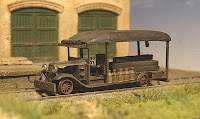
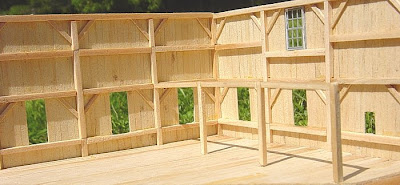
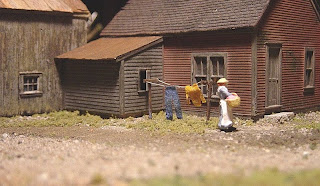
I scratch build much of what you see here like the WW1 ambulance above but that is for an entirely different post that I will attempt someday. My hope was to familiarize folks with the procedure I use to complete this form of 1/87 scale model outside of the manufacturers recommendations. Again I apologize for not showing any step by step photos but quite frankly, I get caught up in the build and simply forget to take pictures.
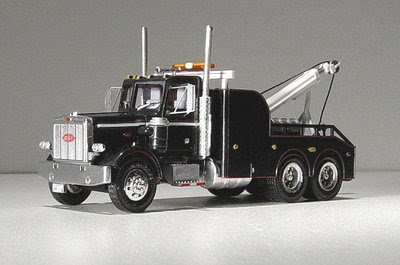
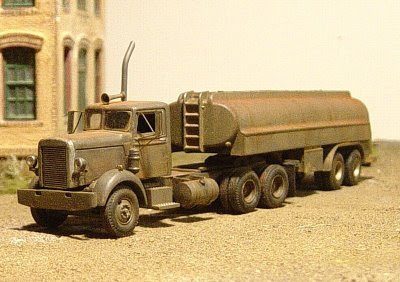
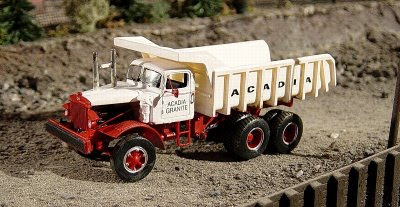
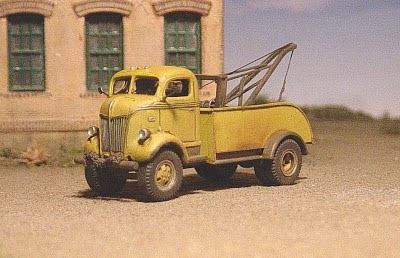
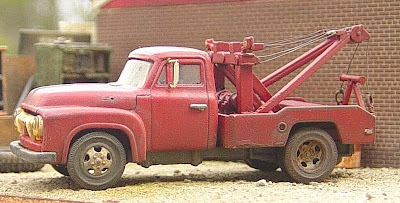
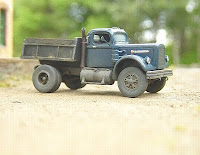
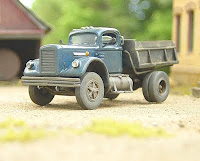
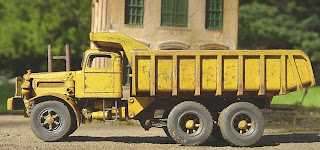
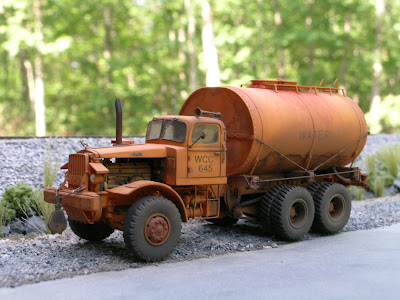
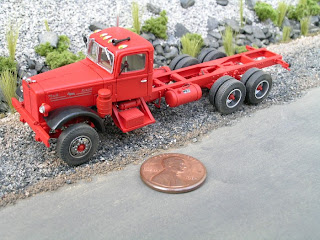
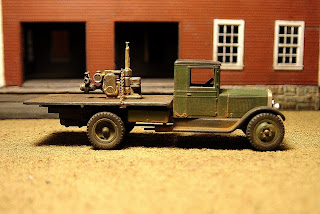
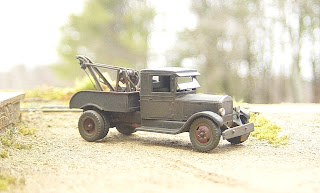
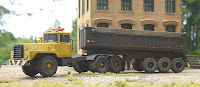
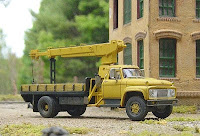
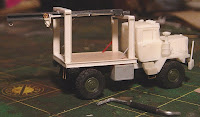
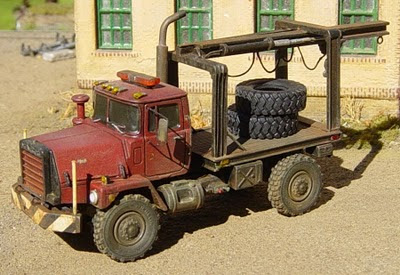
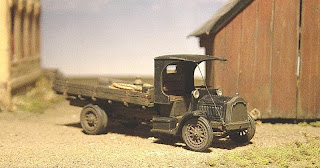
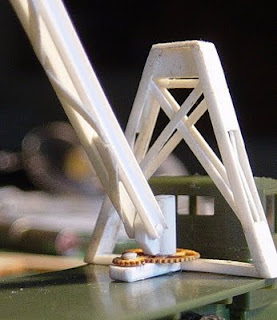
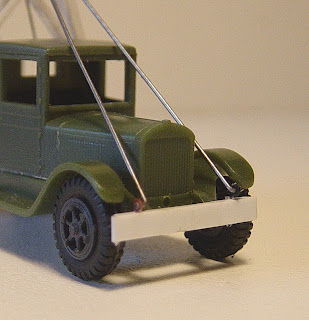
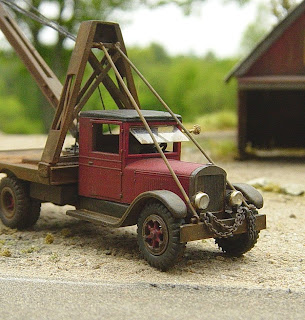
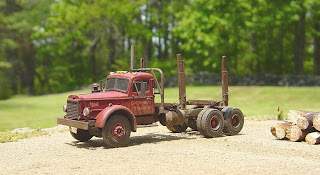
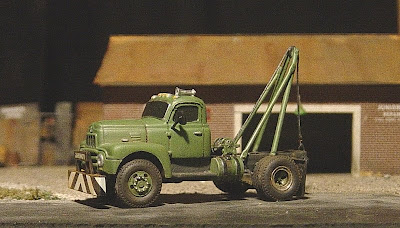
On a roll

$
0
0


I had to have knee surgery in February so things slowed down considerably as I have been recuperating. In fact I have not been back to work and here it is the end of May. But the knee is feeling great and whenever my company says so, I'm back to work. This has been a blessing to some degree in that I've been cranking out lots of models. There have been so many in fact that I'm only going to show a small portion of all that I built.


I've had the opportunity to write a few articles for the Spanish model railroad magazine Maquatren that feature my truck builds. These folks are mostly interested in European prototypes so my options are limited as to subject matter. The first piece is modeled from a photo of a real rail work car sent me by the very talented Spanish modeler Alberto Herrera. It is of a Zis-5 believe it or not and apparently some of these were pressed into rail service and saw action throughout Europe. The model is of course the Roco piece that has had a few modifications aside from the wheel replacement. The most obvious of them is the flat bed which is actually the floor of the body that comes with the Roco model that has had it's wooden sides cut off. The only other change from the kit is a scratch built fuel tank. This was an easy build but yielded a really unique model. Finished it off by weathering it for a working but not abused rig.


The next magazine article was again inspired by a photo given to me by Alberto of a Model AA wrecker that was seen in Spain. These trucks were available world wide so they manage to capture the interest of those from just about everywhere. The base model is the Jordan Products Ford Model AA 1 1/2 ton truck that I scratch built the bed and tow unit for. I copied the bed on the truck in the photo and must say it's lines are perfectly suited to the AA. Went again with trying to convey a working but not dilapidated truck with the weathering. This has turned into one of my favorite builds.


This next project was a compulsion to do some diorama work. I resorted to the old peanut butter jar lid and built this stand alone desktop variety diorama of an old junker in the back corner of a boneyard. The truck is a cast metal kit of the 1920 (?) Kleiber from On Track. The fence is wood and the junk all around is from the parts boxes.


Well that didn't satisfy my diorama urges enough I suppose because I went right into this one that is featured at the top of this posting. I had some architectural taskboard that I glued on a piece of 1/4 " plywood. Cut a hole for a door and plastered what was surrounding the hole. I then scribed the stones with a dental pick and washed them with a light brown. Then I dry brushed the whole thing with a dirty white followed by some touch up with some colored pencils. The wood above and the doors are red birch veneer. The hinges I made from paper wrapped around a small steel pin on the end. We're lucky here to have a lichen that grows on the trunks of trees called "old man's beard" that I used for the ivy. It was sprayed dark brown and while still wet, dipped in tea leaves. This was then sprayed green. the paint made the lichen limp so I spread it out on a piece of glass the way I wanted it to crawl up the wall. When dry it hardened and was easy to glue on the wall.
The vehicle is the 1929 Model A woody wagon. Not too much to say about it except that if it ever comes out of the barn the owner will see it built finished and weathered the same all around. All of this fits into a 4 inch square viewing area and the box is 3 1/2 inches deep.


Again, this is only a small portion of what I've finished the last few months. I'll try to post more as time allows but for now, enjoy! Don't forget that clicking on these photos takes you to a larger image. And thanks for taking the time to look.

How'd you do dat?

$
0
0

There are always questions about a build when others view it. "How did you do that?" echos throughout the forums and lists when someone shows a successful piece of modeling and often the creator is generous enough to share his/her process. Without this sharing of knowledge, I certainly would not be at the point I am with my modeling for there are many in all scales that have contributed to my experience. I have mentioned names like Ken Hamilton, Joe Enriquez and Chuck Doan before here to give credit for a certain technique or material but there are dozens of great modelers out there that can offer good solid modeling basics if you just know where to go and who to listen to. Yes, unfortunately there is not so good, if not simply incorrect information too. So what to look for to find correct information with regard to scale and prototypical accuracy becomes the question.
First of all study photos. I understand that photography plays a big part in this modeling endeavor and many of us aren't as good photographers as we are modelers. But one can't really tell how good a model is by seeing small (500 pixels or less) photos of finished models. If you don't believe that look at what kind of detail is shown on these 4 and 5 hundred pixel photos. Then click on them to see what you're missing. The best modelers I know take detailed shots of individual assemblies in large format. You can really see the details close up and isn't that what modeling is all about? Being able to see in miniature what we see in real life. If you can see fine details well constructed to scale in a photo then you have a better idea of what kind of modeler is doing the build and is he/she worth listening to.


I let my photos speak for themselves and you be the judge of how good I am (or not). I try to convey in a photo the best description of the model seen as if you were holding it. Yes, I try to make an esthetically appealing photo but making sure the model and it's details are the photo's foremost feature. I won't try to tell you how to take photos because I do not profess to be all that good at it. And because that's not the point of this writing (read: rant). I just want to say that being able to actually see all of a model and every small detail in it is the best way to judge whether a modeler has anything valuable to contribute. The proof is in the puddin'!

The truck crane featured is not a particularly spectacular model in my opinion. I took a rather complicated subject to build that I really liked and sacrificed some precision on the build in order to complete it. But it conveys the feel of the original prototype and has been done in a plausible manner. Key word here being plausible. Is the model something that actually existed and if so are the proportions to scale and accurately placed? Are the details era specific and appropriate to the size, use and type of vehicle you are building? These are questions you have to answer yourself as the builder and good research will help in a successful project. Just saying that it looks right to you isn't going to get a superior model unless you're very lucky. Measure, do the math and know that you're right. The prototype of this truck shows no winch or motor to power it in the bed of the truck. I make the "plausible" assumption then that the winch is under the bed with PTO from the driveshaft.


The bed was the easiest part of this particular project of course being a simple sheet of styrene cut to fit. I used the styrene deck from the Roco model for this and glued .125" U channel around the perimeter with wheel well cut outs in the appropriate spot. The Boom frame is .10" U channel that has had the center cut out. .015" styrene strips were used for the X bracing inside the cut out and a slightly wider strip was used for the diagonal bracing front and back. Blocks were glued inside the top of the frame to accept the pulley in back and support rods from the bumper. These rods are very stiff steel used by R/C/ model airplane builders for control rods to flaps etc. The bumper is the same .125" U channel, drilled out on the top to accept styrene eye bolts from Tichy. The same eye bolts are used on the top of the boom frame.

The boom is again the .125" U channel spaced apart with lattice work on the bottom of the boom from the same strip styrene as used for the frame diagonals. the end has a sheave made from styrene rod and pinned in place with rivets from Tichy. I used the rivets for ornamentation as well down the length of the boom in a plausible pattern. At the base of the boom, a 3/32" styrene tube was cut to length and a block glued to it to attach the boom foot, fastened with a styrene rod with rounded ends. To round the ends of a styrene rod, hold it close to (not in) a flame until you see it round over. It makes a perfect convex. To the bottom of this, I fixed a block of styrene with gears from Vector Cut. These are highly detailed laser cut reinforced card stock. All sits on a raised platform of grooved styrene to simulate a wood deck.

Finally, the not so great pulley is a brass strip bent in the shape of a U, drilled out and a piece of styrene rod was pinned inside with Tichy rivets. The cabling is cotton (not recommended) that has been run through moustache wax to relieve it of it's fuzzies.


For the finishes I use, please take some time to go through the archives here. I have posted on several topics the methods I use to acquire the desired finished look on individual models. Suffice it to say that this model didn't get a lot of weathering treatments since I really didn't want a beater look to it but rather just a working truck. I hope this has been informative as well as entertaining. I enjoy bringing it and my models to the world. The world you say? I have just shipped models to Switzerland, Santiago, Chile and Paris, France just this week. It gives me great pleasure to know that over the years in every continent but Antarctica, someone may be viewing a bit of my work. And what better way to promote the hobby than presenting the real article not just a photo on the computer. So thank you for visiting and please check back often. Oh, don't forget, clicking on these images that accompany the text brings up larger photos.

Filling in the blanks

$
0
0


As I mentioned a few posts back, I've been on the disabled list for a while with my knee problems. And managed to do quite a few models sitting here with nothing better to do. I'm not a big TV watcher so in keeping my fingers and mind busy have these additions to my former posting on what I've been doing.


A project that sat half finished for some time is the Mack LJSW from Sheepscot Scale. Had no idea where to go with this until I decided to buy the stinger trailer for logging from Dennis Aust. Well they have been sold out for some time and I wasn't too familiar with back dating the trailer to the era of the truck so I decided to make this an eastern rig anyway. We see mostly straight trucks here in New England for logging and this model seems to fit the bill.


The truck was placed on an Athearn B model Mack chassis in order to get the correct Mack suspension. The frame was lengthened slightly and the bunks were scratch built from styrene. The cab steps are photo etched diamond plate on wire supports. The headlights were made from shaped styrene rod and have bent styrene strip mounting brackets. The exhaust is aluminum tubing used by R/C airplane modelers for fuel lines.


The next truck worth mentioning is the 1941,46,47 Chevy that I've made into a rural fire department pumper unit. The bed is entirely scratch built from styrene sheet. The process I use for scratch building most of my bodies starts with finding out the size of the prototype. I then calculate the size in scale and do a drawing on my computer using a vector based drafting program. I print two copies of this on Manila card stock. One I cut out and glue up as a mock up to see how the bed will fit my chassis. The second I cut out and use for templates for the styrene, brass, wood or whatever material I am building with. I then can replicate the body as many times as I want.


The Chevy cab and chassis are from Sylvan Scale. To it I have added a rotating beacon made from two different size styrene rod and a fender mounted siren from Ralph Ratcliffe models. Also from Ralph is the nifty Indian pack on the driver side running board. The wheels are from Jordan that can be purchased separately from them. The running boards on the pumper body are photo etched diamond plate and the hose reel is scratch built as well.


Staying with 1946 a moment brings us to the year the Colecto-Pak refuse body by Heil was first introduced. This was the first actual compaction refuse body ever produced. After seeing an advertisement from Heil of that year featuring the 46 Chevy cab over, I knew where I was going with this one. The cab and chassis are again from Sylvan with the Jordan wheels. The packer unit was taken from measured drawings I found and completely scratch built from sheet styrene using the method I describe above. Below is the drawn profile of the packer unit.


Another model I want to show this post is also a 1946 Chevy cab over, it also from Sylvan and having the Jordan wheels. This time in a wrecker. The bed was scratch built as was the tow unit winch and boom.


One last quickie here since I showed it in the Jordan posting earlier but it's the first one I did after surgery and one of my personal favorites. In July of 1917 the U.S. government contracted Ford to produce a field ambulance for the war. By September, there were 2400 already built with a wooden body on the Ford touring car chassis. So this 1/87 scale model utilizes the Jordan Model T touring car chassis and front clip. The rest of the ambulance is scratch built from styrene sheet. The cab canopy and rear flap are tissue paper.


It is time again to sign off and see what's on Oprah. Yeah right.
Viewing all 54 articles
Browse latest View live